
Boring Lab at Milestone MIPS 2020

Come see the latest version of the Boring Toolbox at Milestone’s annual Integration Symposium this year being held at the Gaylord Grand Texan in Dallas, TX. When: February 17th, 2020 Where: Gaylord Texan ResortGaylord Trail 150176051 Dallas, Texas Click here to sign up. Boring Lab will be at table 200 and hope to meet you there!
What is XProtect Interconnect & how to manage it
Milestone released the Interconnect feature back in release 2013 and since then it has been a powerful tool that allowed creative admins numerous ways to scale their systems horizontally. What is the Milestone Interconnect Feature? Interconnect is a feature that allows an XProtect Corporate VMS to connect to multiple geographically dispersed remote XProtect surveillance installations in order to centrally view camera streams, receive events, and even record. Where is interconnect used? Due to its flexibility Interconnect can be used in numerous use cases but below are a couple that demonstrate the benefits nicely. TransportationBus, train, ship transit systems need to centrally record video from vehicles and vessels that are only intermittently connected to the Corporate VMS. With interconnect the remote systems in the transient vehicles can connect to the main system only when needed or on a set schedule. City/Corporate SurveillancePolice departments of both public and private entities need to be able to connect and manage VMS installations at sites they own/control as well as those of partners and vendors. Interconnect allows for the remote systems to remain under the management of the third party while still allowing the PD access to view and record video and respond to alarms. Management of Interconnect today In the above topology you can see that the use of Interconnect can scale to hundreds of sites (ie: management servers) and thousands of cameras. But, while the remote systems operate as-if they are one centralized system, they are in reality still individual VMS installations with a separate management server and physical cameras connected to their own recording servers. This means that each site must be managed individually by connecting the Milestone management client to each management server or by the use of remote desktop or some other RMM solution. With the potential of hundreds of sites and thousands of cameras this could become a tedious manual task. Interconnect with Boring today You can use Boring Toolbox with Interconnected systems to gain efficiency. Here is how it works today. AlertingDepending on the configuration of the XProtect central Corporate site, Boring Live Monitoring will work as expected. That means that if the central site is configured to stream video from the remote sites 24×7 then a Boring Client connected to the central site will be able to report when interconnected cameras are up or down. If however, the remote sites are configured to only stream video upon request or event, these interconnected cameras will always look offline and therefore will render Live Monitoring useless as you will have more false positives than actual down cameras. Because of this, we have implemented a setting that will ignore all interconnected cameras when using Live Monitoring and Reporting allowing the administrator to still use Boring Toolbox on the central site with full functionality. Unfortunately, in the above case, to see the remote camera health and receive alerts you will need to connect another instance of Boring Toolbox to each of the interconnected management servers. ReportingReporting is similar to alerting where an admin can choose to keep interconnected cameras in the central report or ignore them. Unfortunately, if remote managed cameras are kept in the report, the central site only sees them as “interconnected” devices and hides the rest of the camera details making your report less comprehensive. This means that multiple instances of Boring Toolbox, connected to each interconnected management server is currently the only way to get all the camera details in the Boring camera report. Bulk ManagementTo take advantage of Boring Toolbox’s bulk management, password management and device group management features an admin will have to connect to each interconnected management server individually. Management of Interconnect tomorrow As of version 4.2.x we now include multi-site management for Milestone XProtect which allows admins to connect to multiple XProtect interconnected sites in one client.
How To Send XProtect Notifications Securely, Without Compromise

In this note we will discuss the use case for notifications in Milestone XProtect and how to enable it securely. Where can you use notifications in XProtect As a Milestone XProtect admin you can’t be watching your system all the time so email notifications are critical for letting you know when something needs attention. Using rules in XProtect will allow you to triggers those alerts. The rules engine in Milestone is very powerful and allows you string together different actions based on triggers. Triggers can be a physical switch, software analytic or system message and in most of these cases you, as an admin would like to be notified via email that the trigger was activated. There are hundreds of different variants but here are some simple examples: Physical Switch: You have an input device like an Axis A9161 connected to an output of an intrusion panel and when the intrusion alarm is tripped you would like an email with an image from an associated camera. Software Analytic: You have set up an intrusion zone in Agent-VI and when someone enters that zone during a certain time frame you want an email with the image of the person or vehicle entering the zone. System Event: You want an email alert when the archive storage is no longer reachable and Milestone can not archive video. How to enable notifications in XProtect VMS Enabling email notifications in Milestone is pretty straight forward but unfortunately prior to version 2019R2 Express+, Pro+, Expert and Corporate versions of Milestone do not support SSL/TLS encryption which is important when connecting to secure email services like Gmail / Gsuite. The lack of support for SSL/TLS leaves your options for sending email notifications limited to open SMTP relays from gmail, which have limitations, or using your own in house email server. Enable TLS support in Milestone 2019R1 and below As mentioned, Milestone versions 2019R1 you can not use SSL/TLS but with the use of an opensource 3rd party application called hmail you can! Milestone has a great knowledge-base article on how to use hmail to enable notifications via Gmail in XProtect. Enable TLS support in Milestone 2019R2 and above In 2019R2 and above Milestone listened and is now natively supporting SSL/TLS directly in the VMS. Here is how to use it: In XProtect management client select tools > Options > Mail Server Sender email address = Email address you want the notifications to come from Outgoing mail server address (SMTP) = smtp.gmail.com Mail server port = 587 Encrypt the connection to the server = checked Server requires login = checked User name = In Gmail this would be the user account email address that you want to send notifications through Password = Password for the selected Gmail user OK Lastly you will need to set up a notification profile in management client to actually sent emails. Milestone has a great video on this here. Secure email through Boring Toolbox At Boring Lab we take security seriously as well as so we have built secure email notifications into Boring Toolbox as well. When using the Live Monitoring feature you have two methods of getting real time notifications on cameras enabled or disabled. Native Boring email provider You can quickly enable email using the Boring Lab email provider to securely send emails without the need to have your own email server. Custom email provider By using custom settings in Boring Toolbox you can use any mail server including gm Hope this helps and if you want to try out Boring Toolbox’s Live Monitoring with secure notifications give our Free Trial a shot!
Visibility is the key to running efficient video storage
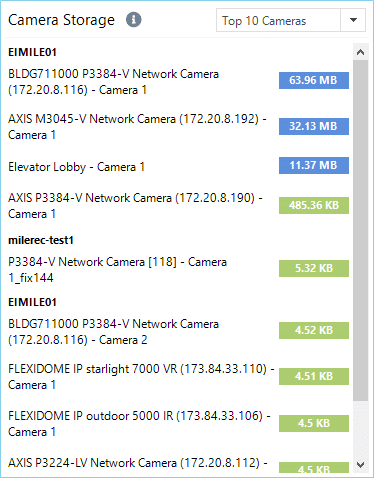
When people think of an IP security network, storage is usually one of the last things considered – but can also be one of the biggest investments. Sure, high-definition cameras with WDR and infra red filters can provide extraordinarily sharp images and a multitude of features that will enhance any organisation’s security mission, but for all that clarity and flexibility of vision, there comes the increased need to store much larger amounts of data. Furthermore, as other components of a security network evolve, there is more and more that can be done with that data. Think of analytics being able to map pedestrian traffic in a loading dock, and establish the optimal paths for employees to travel for speed and safety; or Facial Recognition (FR) recognising individual employees as they enter a secure area at an airport, and instantly flagging anyone who does not have the correct credentials to enter that part of the premises. Again – great features that can provide a wealth of benefits to any security ecosystem, but all that video data needs to be stored somewhere. Depending on the camera’s resolution, plus the frame-rate to which it is set, any given camera on the network might be running at 5 Mbps and possibly producing the need to store as much as 60 and 400 GB of data in a month. If that security network is at, say, an international airport, that is a whole lot of data to be moved across the network and stored. So, the last thing you want is an unexplained spike in data storage. However, there are plenty of reasons for a camera to suddenly run at a much higher data rate than it used to. Take a recent example – a network of both indoor and outdoor cameras, from a range of vendors, monitoring a section of an airport in the US. Suspecting that there was a spike in data usage, the administrators used their Boring Toolbox to isolate cameras in each section of the network, and instantly pull up their data use. This allowed them to quickly see that three outdoor cameras in the same area were consuming about five times the storage that they ought to be. Using the Toolbox’s hardware details view to check the three cameras, it was quickly established that a family of spiders had decided to set up their home in each of the camera lens housings…which of course tricked Milestone VMS into recording a higher level of motion causing the cameras to consume more storage that it should normally. A technician was dispatch and the issue was resolved. While it is possible to pull up individual cameras on a VMS and see how much data they’re producing, the sheer scope of checking each camera individually is daunting and rarely gets done. Using Boring Toolbox and its camera storage tile on the dashboard this was identified within seconds. To find out how you can visualize your storage, say hi!
The Benefits of Creating XProtect Device Groups – Automation & Organization
Last update November 2022
XProtect Adaptive Streaming. You want this and here is how to deploy it quickly.

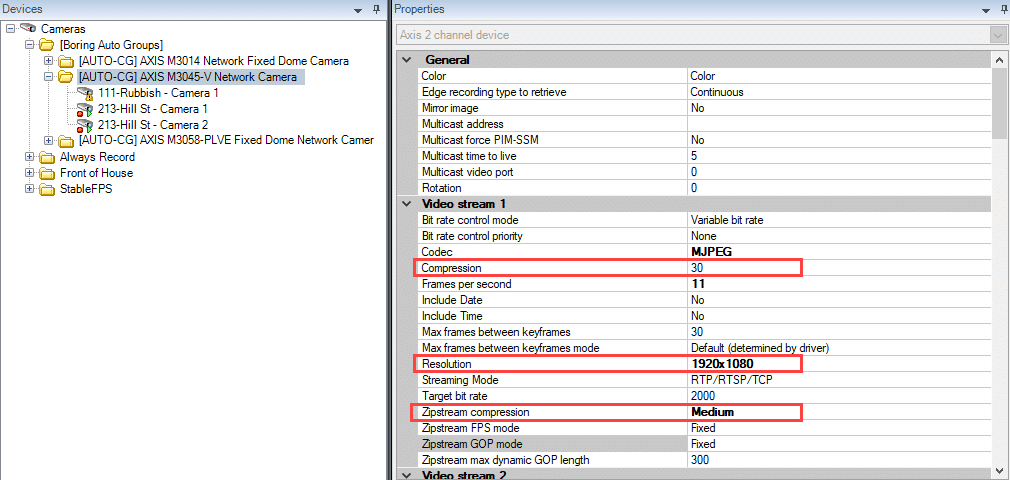
in version 2019R3 Milestone released a new and greatly requested feature called adaptive streaming that will help reduce network throughput, and more importantly the stress on the client hardware needed to view many cameras at once. So let’s get into it. XProtect adaptive streaming is available in version 2019R3 of Expert and Corporate and requires both an upgrade of the server and client software. What is Adaptive Streaming? Adaptive Streaming is an XProtect feature, designed to improve Smart Client performance by dynamically reducing the stream resolution. It allows smart client to automatically choose the lowest (“most appropriate”) resolution video stream available to fit the view tile size. As an example if you had a 4 x 4 view on a 1920 x 1080 resolution monitor each tile is in Smart Client would be only 480 x 270 in size. Now, lets say you had 16 x 1080p cameras you wanted to stream into that 4 x 4 view. Previous versions of the Smart Client would pull 16 x full 1080p video streams into those tiny 480 x 270 tiles. This would take up unnecessary network bandwidth but more importantly would unnecessarily tax your workstations CPU and GPU to present those 16 streams of 1080p. With Adaptive Streaming, you can set up multiple streams, at different resolutions, and Smart Client will choose the most appropriate one to fit the actual resolution of the tile. So in our example, if you had a second stream set up for 480 x 270 Smart Client will dynamically pull the 2nd camera stream and only pull 16 x 480 x 270 streams greatly reducing the load on the workstation. What do you need for Adaptive Streaming to work? XProtect Expert or Corporate version 2019R3 (see hotfixes here) Smart Client 2019R3 (see hotfixes here) Set up multiple streams on each camera at different resolutions Enable adaptive streaming in Smart Client profile under Advanced. Default is Enabled. Check all caveats and considerations here Setting it up Quickly The only thing you really need to set up to make Adaptive Steaming work is the multiple-streams per each camera. With ten or even 50 cameras this can be done manually via the management client but for larger systems this can be a very time consuming task. Here is how you can do this quickly. Configuring the streams using Boring Camera Settings With Boring Toolbox’s camera settings feature you can set your different stream resolutions and frame-rates across multiple cameras at the same time, regardless of camera make and model. Launch Boring Toolbox Click Hardware Select the cameras you would like to configure a second stream Click Camera Settings Click Yes to only change settings on enabled cameras This will load all your selected cameras in a new dialog Filter the list of cameras by stream number, using the Video Stream drop-down To change frame rate for example Click the Frames Per Second (FPS) tab Video Streams = Video stream 2 FPS = Custom Enter the desired FPS in the text field Click, Apply Selection You can do the same for Codec, Resolution and Streaming mode Repeat for additional streams if you would like Finally click Preview Review changes and click Apply Example of how to set frame-rate in bulk across different device types using settings Enabling the newly configured streams Once the settings have been pushed out you will need to enable the streams so that they can be used by Adaptive Streaming. Again you can do this manually in management client or you can use a combination of Boring Auto-Groups and management client to push this change faster. You can make bulk changes in management client using device groups, BUT the device groups must only contain cameras of similar make and model in order to make those changes. This is almost impossible to manage manually and so we created Auto-Groups. In this example we have all Axis Cameras and we would like to enable the 2nd stream using both Boring Toolbox Auto-Groups and XProtect management client. Create device groups with Boring Toolbox In Boring Toolbox, click Device Groups Create a Device Group called Axis Cameras Click on Add Device Group Rename the group, Axis Cameras Click on Auto Device Groups Recording Servers = All Recording Servers (Default) Grouping Template = [Camera Model] (Default) Parent Group = Axis Cameras Status = Check Enabled Only (Default) Click Preview This will automatically create a devices groups for each of the camera models you have in your XProtect VMS Select only the Axis models Click Next Review, click Save Changes Example of using Auto Groups to dynamically create groups Enable the streams in XProtect Management Client Launch XProtect Management Client Click, Devices > Cameras Select the, Axis Cameras, device group Click on the Streams tab Click Add, which adds another stream Stream = Stream 2 Name = Low Stream (or whatever you would like) Live Mode = When needed Click Save This will update the stream settings for all your Axis Cameras in that group…could be hundreds! Example of how to enable a 2nd stream in management client after using Auto-Groups Reach out to us today to learn more about how to save hours enabling Adaptive Streaming with Boring!
October 2019 Release
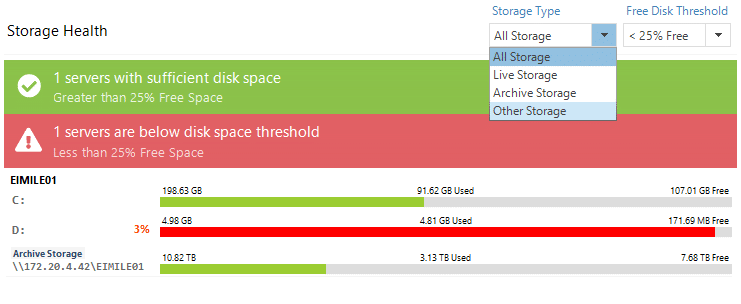
In October we have built upon the features released in September and upgraded notifications, added some configuration flags and expanded support for our bulk configuration. Additional Email Notifications We have added an additional email notification based on a minimum number of cameras “not providing video”. This is good for those very large deployments that want to only be alerted when a group of cameras all go down at the same time. We allow you to set a minimum value as well as a time interval and then Boring Toolbox will only send you an email when those criteria are met. **UPDATE: We have removed the need to re-login to the client every 10 hours. So you can now leave the client open indefinitely and process these notifications. Extended Device Support for Bulk Configuration We have extended the support for our bulk configuration, Settings, feature to even more cameras. There is no way to test all of them but we estimate 80%, including Bosch and Sony. Try it and let us know what we are missing! Additional filtering on Storage Tile There is now an additional level of filtering on the storage tile of the dashboard called Other Storage. Live Storage, now only provides details on the drives that are identified in the storage configurations as “live” or first tier storage. Other Storage, shows you drives that are neither Live or Archive. These drives include your windows operating system (OS) C: drive as well as reserved drives provided by NVR appliance manufactures (ie: Razberi). Some additional client updates Added camera “Model” column in password manager grid Added camera “Brand” column in camera export Added camera “Model” in Detail View at Hardware & Device level Added support for Milestone “Enabled” & “Disabled” events for live monitoring cameras providing video Full details can be found on release notes.
Milestone XProtect 2019 R3 – Upgrade Considerations
*Updated : 01/08/2020 Milestone just released XProtect version 2019 R3 with some great new features: Metadata Search in SmartClient Driver Framework Adaptive Streaming and more… However, there are three Milestone KBs that you should consider before jumping in. Smart Clients older than 2019R3 are not compatible KB 19309 discusses the details of the upgraded security protocols used in XProtect 2019 R3 and that this new version of XProtect will not be backwards compatible with older version of Smart Client. With the release of XProtect 2019 R3, stronger security features were implemented, which means the Service Channel feature has been removed. As this feature was used in the earlier versions of XProtect, the older versions of the Smart Client will no longer be able to connect to an XProtect 2019 R3 server. The solution: Upgrade all your Smart Client users to 2019 R3. The smart client itself IS backwards compatible with older versions of Milestone XProtect. There are specific NVIDIA driver requirements KB 17957 outlines performance issues and security flaws in the previous version of NVIDIA drivers when using hardware acceleration. It also states that the minimum driver version of 418.96 onwards is required for XProtect 2019 R3. When using Nvidia hardware acceleration for the XProtect Recording Server, Mobile Server and Smart Client, you may experience issues like (but not limited to) image quality degradation, lower performance than expected, memory leaks or even crashes in some cases. The solution: Upgrade NVIDIA drivers to v. 418.96 onwards. Installing mobile server might lock your user account KB19308 discusses how the new version of mobile server may lock your user account due to how it passes the credentials to the data collector service. If you install the XProtect® Mobile Server 2019 R3 under a domainWindows account, the account may be locked (if there is a policy for locking the account after several unsuccessful attempts). The solution: Install the recording server initially as a network service account and then change the service to run as the windows service account. Recording Server crashing, Intel GPU 3rd/4th generation & Windows 10 KB19488 outlines the issue found with hardware accelerated video motion detection when upgrading a recording server to 2019 R3 . After upgrading one of the XProtect VMS products (Corporate, Expert, Professional+, Express+, Essential+) to version 2019 R3, the Recording Server fails when software motion detection is enabled and it is utilizing the Intel GPU on Intel 3rd and 4th generation chipsets running on Windows 10. The solution: Make sure that the machine that is in use also has an Nvidia GPU available, or you may need to install an additional Nvidia video card. Once this is done, disable the integrated Intel GPU so that only the Nvidia one is in use. Inputs do not work in XProtect VMS 2019 R3 KB19672 outlines default security settings in Milestone 2019 R3 VMS that will cause some inputs, typically using the legacy driver, not to function as expected. With the design and security changes introduced in XProtect® VMS products 2019 R3 (Corporate, Expert, Professional+, Express+, and Essential+), the inputs may not work by default on some devices. Not all devices are affected by this issue and most of the affected devices are working through Legacy Device Pack drivers. The solution: Enable the alert server. See KB for full instructions. IF YOU LIKE BUSY WORK BORING TOOLBOX IS NOT FOR YOU… But, you don’t, so Try if Free Today!
September 2019 Release: Notifications and configuration
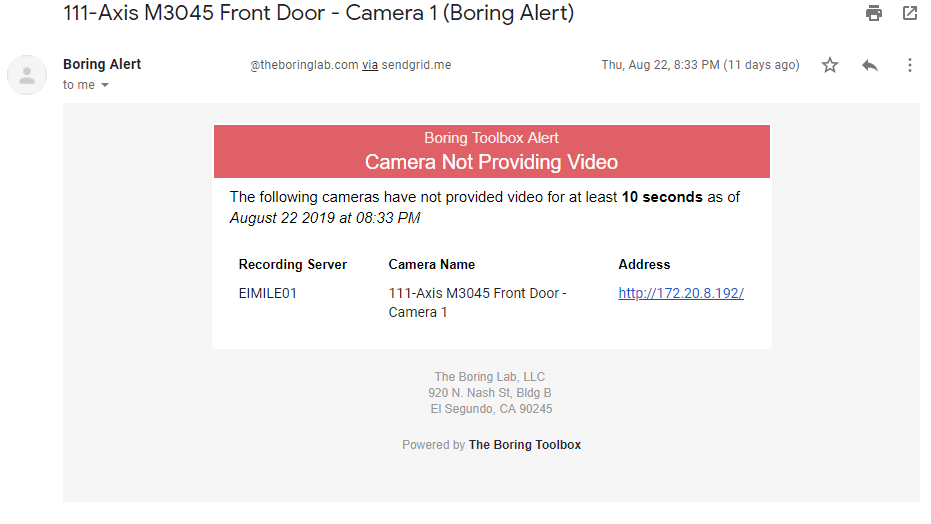
This month’s release has beginnings of features we hope to expand on in the future. We have our first iteration of one touch email notifications for cameras not providing video and configuration options so that you can make small changes to default behaviors of the dashboard. Email Notifications Email notifications for cameras not providing video are now available via our Boring Mail Server or via a custom SMTP server of your choice. Above you can see the alert you can expect to see. You will notice that we tried to capture the pertinent information needed to at a glance take appropriate action. Learn how to quickly enable email notifications here. On the same page you will also find the instructions on how to enable a custom SMTP server or to send the emails via gSuite/Gmail. One current limitation is that the client needs to be open and logged-in for notifications to work. The client can only be logged in for a certain period of time before you will now be prompted to log in again by the new lock screen. Dashboard configuration options You are now able to customize the default options found on the dashboard. Here are some of the options you can update via our config file. Disable dashboard on login. More information Change default storage health threshold on login. More information Change default camera storage disk usage value on login with application setting “CameraStorageDefaultTopCount” Change Live Monitoring “Camera Not Providing Video” threshold (timeout). More information Camera storage filtering By adding some filtering options we are now able to glean some additional information about cameras health Sort by ascending/descending Sorting by ascending will show you the top 10 to 50 cameras that are consuming the least amount of storage. This is important as it will allow Milestone XProtect administrators to quickly see cameras which are not recording but potentially should be signaling a configuration issue or potentially having a camera that is obstructed or tampered with (all black video). See only enabled camera devices in the list If you are sorting from lowest to highest seeing hundreds of of disabled devices with 0 KB storage consumption would be quite useless and so we created a filter so that you see only enabled cameras. This will allow you to really make the interpretations of the data. Report Updates Added firmware of the device to the report. Added the ability to update the snapshot timeout threshold. More information Password Manager Updates We have a couple of small but useful updates to the password manager. Synch indicators You can not quickly see which cameras are synchable as well as filter out those which are not. Full details can be found on release notes.
20 Second XProtect Challenge

We wanted to show you how much time you can actual save with Boring Toolbox and so we are putting our money (figuratively of course) where our mouth is. We are going to take basic Milestone XProtect management activities and pit Boring Toolbox against Milestone management client and see which tool can perform those functions in under 20 seconds. Ready, go! 1. Reporting on video health in less than 20s In this challenge we try to create an Excel report on all cameras that are not providing video to Milestone VMS. We test this using Milestone management client and manual copy of pertinent details to Excel and then through the Boring dashboard Live Monitoring tile. https://youtu.be/HNsmahrfvuk 2. Reporting on camera storage health in less than 20s In this challenge we try and identify the cameras that are using the most amount of storage on the VMS. A camera consuming more storage than expected could be a sign of <<spiders>> or other creepy crawlies or potentially mis-configured motion detection settings. https://youtu.be/dlHQCeaG_fA 3. Disabling all microphones in less than 20s This one might be a bit specific, and it actually does have a very real use case, think GDPR audit, but this is just an example of how you can use multiple features of the Boring Toolbox to achieve an end result extremely quickly and efficiently. https://youtu.be/3aO7nHpTNjg 4. Reporting on camera video retention in less than 20s For those industries that require compliance with video retention laws a quick way to audit how long each camera is being recorded. With the new Boring Toolbox retention reporting function you can export the retention of each device in days as well as the period of retention in an easy to read and audit Excel report. https://youtu.be/tLp_40y2qCo 5. Creating camera groups by model in less than 20s In Milestone XProtect you have the ability to make bulk changes to camera settings using the Milestone XProtect management client. There is a catch though, you will need to have each of your cameras in specific camera groups based on make and model. Without these camera groups you will not be able to make those bulk settings changes to camera setting in the Milestone XProtect management client. To fix this the Boring Toolbox has created Auto-Groups! Boring Toolbox will automatically create device groups in Milestone XProtect making them more transactional and allowing you to quickly push out this bulk settings changes. https://youtu.be/0gTjataasz4
