
July Release: Filters, Filters, Filters
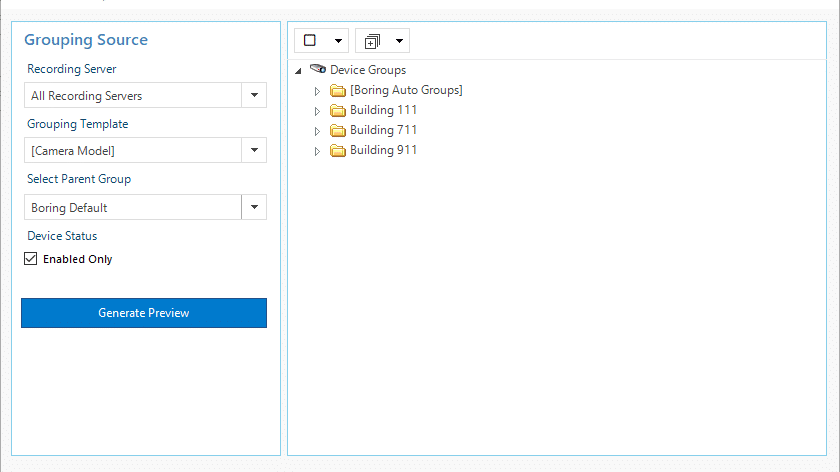
This month we are releasing some long awaited features to enhance Milestone XProtect management. Check them out below. Filtering & Drill down There are points in time when you need to drill down to specific devices or storage in order to more easily make sweeping changes or maintenance. To answer this need we have added new filters (drill-down) options to all parts of the Toolbox. Dashboards: Camera Storage Tile In the last release the camera storage tile would show the top storage consuming cameras for the system as a whole but if you have a large system with a lot of different recording servers that might not provide you all the information you need to maintain a healthy and efficient storage environment. That is why you can now filter and drill down in to the top 10 to top 50 most storage consuming cameras PER recording server. You can find this filter in the drop down right next to the top X filter for the tile. Dashboards: Storage Health Tile The storage health tile is perfect for finding servers that are running low on disk capacity but we received feedback that sometimes archives are going to be close to full most of the time and it is really the live disk that is critical. Why is the live disk critical? Well, it is because a live disk that is filling up typically is a sign of a problem with your archiving function. So, we added a drop-down filter to allow you to apply the storage threshold to either the live, the archive storage or both (default). Hardware: Filtering Ever been asked to make sure all microphones are disabled across the fleet in order to comply with state laws? Did you have that feeling in your gut of despair just thinking about going through hundreds or thousands of devices one by one? Well we have listened to you and implemented filters in the hardware section in order to quickly drill down and find the hardware you need to change. Below is a image showing you all three filters plus search working in conjunction to provide a list of only enabled cameras, on a specific recording server with location ID 1604 in the name. Hardware: Recording Server Filter Type We have had this filter all along but now it can be used in conjunction with other filters + search instead of independently. Chose to filter your list of devices by a selected recording server Hardware: Device Filter Type Filter by All Devices: This is the default and will show all devices under the hardware Cameras: Will show only camera devices under the hardware Audio Input: Will show only microphones or other audio inputs under the hardware Audio Output: Will show only speakers or other audio outputs under the hardware Input: Will show on Inputs under the hardware Metadata: Will show only meta data under the hardware Output: You guessed it….will show only output devices under the hardware Hardware: Device Status Filter Type Filter by Any Device Status: This is the default and will show devices with any status Enabled: This will show only devices that are enabled Disabled: This will show only devices that are disabled Providing Video: This is pulling from live monitoring on the dashboard and shows only those cameras that are providing video in Milestone Not Providing Video: This is pulling from live monitoring on the dashboard and shows only those cameras that are NOT providing video in Milestone Auto-Groups Revamped We have revamped auto-groups from scratch with a new UI and the ability to create auto-groups inside already existing groups. Here is what it looks like with auto-groups embedded in a high level device group Additional Details Added some additional details in the form of a list of clickable device groups.
June 2019 Release : Dashboards and Details
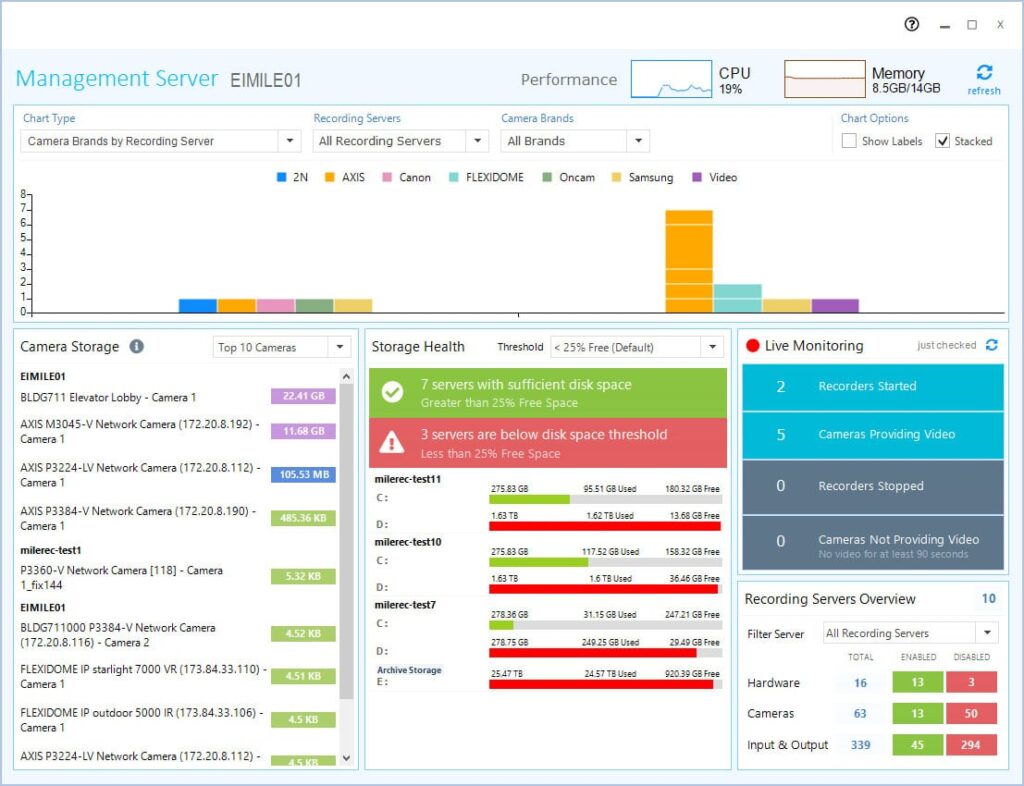
We have been working on this new release for some time now and the team is very excited to be able to release our first iteration of Boring Dashboards for Milestone as well as details for hardware and devices. Let’s get into it! Dashboards This is not meant to be a full SNMP monitoring package, there are plenty of those to choose from, the Boring dashboard is meant to be a simple to use, pane of information that bubbles up system statistics that will actually mean something to a Milestone XProtect administrator. To come up with the charts and tiles we reflected on our history of installing and maintaining Milestone systems and came up with what we believe are going to be the most useful pieces of information but we would love your feedback! Management Server Status Most of the dashboard revolves around the recording servers but here we are wanted a simple view of the CPU and memory usage of the management server. Boring Dashboard Charts The dashboard is broken up into two main sections, charts and tiles. The charts are on the upper half of the window and tiles below. The charts are filterable graphs which provide a high level overview of the entire surveillance system. Additional details can be gained by hovering the mouse over the bars in the chart. Default Storage Usage by Recording Server This chart will show used/free space on OS and LIVE video database drives only. Filter by Recording server and Disk Blue = Used space Grey = Free space Archive Storage Usage by Recording Server This chart will show used/free space of drives designated for video archives, including NAS/SAN drives Filter by Recording server and Disk Blue = Used space Grey = Free space Hardware Status by Recording Server This chart will show the number of hardware devices that are enabled/disabled on each recording server. This is great for planning and load-balancing. Filter by Recording server Red = Disabled Hardware Green – Enabled Hardware Camera Video Status This chart will show the number of cameras that are providing an image to Milestone and those that have not provided an image for at least 90 seconds. These cameras can still be online and pinging but are for some reason Milestone can not pull video from the camera and is therefore not recording. Filter by Recording server Green = Providing video Red = Not providing video Camera Brands by Recording Server This chart shows the quantity of each camera by manufacturer and model per recording server. This chart is great for systems that are under transition from one camera brand to another or one technology to another. Imagine a large system transitioning from encoders to IP cameras. This chart will help you quickly see where you are in the transition per recording server and how to plan. Filter by Recording server and Camera Brand Boring Dashboard Tiles Dashboard tiles are more detailed views of the system and provide more actionable data. Camera Storage Tile This is a top 10 to 50 cameras using the most storage. This is used to quickly identify defective cameras, cameras with unexpected constant motion (read: spiders and other insects) and those that might need to have motion adjusted. The list can be extended by selecting the number of cameras, up to 50, to display in list Camera names are links to the camera in the hardware panel so that you can receive additional context or link to the camera directly The recording server must be online for this chart to provide data Storage Health Tile This tile provides an at-a-glance view of the recording servers and their storage health. The list will only populate results for servers that have at least one disk below the threshold identified by the “threshold” drop down (default < 25% Free). If all server storage is healthy then you will see a green bar that states “All recording servers have sufficient disk space” When servers have drives below the threshold you will see them identified with all disks enumerated. Green = Free space greater than 50% Orange = Free space less than 50% but greater than the threshold Red = Free space less than the threshold Live Monitoring Tile This tile provides greater detail on the video and recording server availability. We monitor the four items below: Recorders Started The number indicates the recording servers that are online and reporting to Milestone Cameras Providing Video The number indicates the ENABLED cameras that are providing video and are functioning as expected Recorders Stopped The number indicates the recording servers that are offline and not reporting to Milestone. Details link will pop out a modal providing additional context as to which recording servers are not responding. This list can be downloaded into Excel and saved for further investigation. Cameras Not Providing Video The number indicates the ENABLED cameras that have not providing video for at least 90 seconds and are not functioning as expected Details link will pop out a modal providing additional context as to which cameras have not provided video to Milestone. This list can be downloaded into Excel and saved for further investigation. Note that the cameras may still be reachable by web interface but this value strictly identifies that the device is not providing video to Milestone. Recording Servers Overview Tile Provides a quick reference on the number of hardware, devices and IO devices are enabled on the system as a whole or per recording server. Filter by Recording Server Hardware Details Hardware details provides greater context for recording servers, hardware and devices on the Milestone VMS. Additional context will show when the item is highlighted via a grey bar. This selection is independent of the check-boxes found next recording servers, hardware and devices. Recording Server Context Hostname IP Address This is a hot-link which launches Microsoft Remote Desktop directly to the recording server Enabled/Disabled statistics for hardware, devices and inputs & outputs for the recording server Storage Details Shows details of all the disks and
What you need to create solid documentation of your IP video Surveillance system

What is surveillance network documentation This blog applies to both self-maintaining end-users and video surveillance integrators using any VMS. Documentation of your VMS installation can come in many forms but in general it is a collection of the most important aspects of your installation and a detailed reference for you and your team in the event of an expansion, maintenance or an emergency. Why is documentation important A video surveillance system is no longer a simple NVR or collection of NVRs with analog cameras terminating directly on the dedicated hardware. Today VMS installations are created by the careful integration of compute, storage, network, cameras, UPSs and each of these devices requires, at a minimum, an IP Address, username and password. That’s a lot of information to keep in your head so be sure to put it in Excel, in notepad, on a napkin, anything that you will keep safe. So aside from just jogging your memory why else is documentation important. Sharing with your team. You might not always be available to provide the needed information when it is needed Sharing inside your organization. Some organizations may have to abide by regulations or standards and good documentation will allow for those teams to audit the installation quickly. Maintenance. When you have a problem with a device and need to replace it with a new one. You will need to apply the existing parameters and positioning to the replacement in order for it to function. What information do you need in your documentation Compute (Server, Desktop, Appliance) Host name IP address of all nics Network What device is plugged into what port and patch panel and/or switch IP address of the switch Where the switch is located Cameras What recording server the camera is on Make/model Name of camera IP and MAC information Status (enabled, disabled) Credentials of the camera Point in time snapshot of the camera field of view Resolution Frame rate Once you have the information gathered you need a place to record it Excel The vast majority of administrators will use Excel for their video surveillance system documentation. It is ubiquitous, easy, portable and quickly edited. Google Drive Google drive is a great place for the VMS documentation as you keep all you files in one place, including sheets, pictures, configuration files etc. You can take all this with you on your mobile device and share with a teammate. Intranet or Wiki Intranet is an internal company website that allows you to add and update information about your VMS deployment. This is typically in the form of a wiki so it might be a bit more cumbersome to add text and data but you have all your info in one place and in the same format. The only challenge with a wiki is that it is hard to share with customers or vendors. Cloud services Cloud services have also become more and more popular for documentation. Here are some notable mentions IT Glue, Liongard and SI Portal. How Boring makes it easy All the methods above require a lot of manual data entry, especially on larger camera systems with hundreds of IP cameras. Imagine manually taking a screenshot of a 200, 300, 1000 camera system and then adding them to a word document. What about reviewing each camera’s video settings (frame rate and resolution), this would take hours. Here at Boring our mission is to save you time and so we try to remove those repetitive and tedious, but very critical, tasks from your job description and do them for you. Unfortunately we can not do it all (yet) but what we have done is automate the documentation of your Milestone system including all the important camera details like IP Address MAC Address, Video stream settings(FPS, resolution, CODEC, etc) Point in time Snapshots of the camera image Camera credentials (username and password) We estimate it would take an admin at least 90 seconds to fully document one camera so just multiply that by hundreds or thousands, and then think about the the mistakes that come along with that boredom and monotony. Finally consider that this report you spent tens of hours making is out of date the day after it is complete. Wouldn’t it make sense to automate a lot of this? Tools like the Boring Toolbox which have deep and powerful integrations with Milestone Systems XProtect can automate many of the aspects of the system reporting and save countless hours, headache and save you heaps of money. Free camera documentation template In order to help you get started click here for your Free Boring report template and if you want Boring to do it for you just give it a try here!
How to optimize Milestone XProtect deployment workflows

As integrators installing Milestone, we have come up with our best practices and standard workflows to maximize efficiency and success. For the most part these workflows were developed around the tools we had built into Milestone XProtect. But, what if you could now revisit your standard workflows and optimize them based on newer management tool sets available to you? We always talk about optimizing Milestone to perform better and be more efficient – let’s think about how we can do the same with our process and deployment. Staging Staging is an important part of the deployment process. If you are not doing this, you should. This is where you bench test all your devices to check for DOAs, update firmware, set IP addresses, NTP, close ports etc. That said, one of the most time consuming/delay inducing parts of staging is trying to get the IP address information back from the client or IT. You send the sheet and then wait and follow up. What if we prepped the cameras and left them at DHCP? Plug the cameras in to your lab network with DHCP Update the password to something temporary Perform the basic maintenance tasks to each device Add the cameras to Milestone with default values and names Confirm all is working, label and take them to site Onsite Configuration When onsite, you can finalize the configuration of the Milestone system as follows: Plug the staged cameras into the production network with DHCP Set IPs on the devices. Scan the network with the camera manufacturer’s management tool and bring in the cameras with the new DHCP addresses. Hopefully by now the client or IP has provided the static IP block for your cameras. If so set the IPs on the cameras. If the client/IT prefers DHCP reservations, leave the cameras as is. We will provide the client/IT with a report later on with the IPs and MAC addresses. Update the IP addresses in Milestone Download a report from the camera management tool with the IPs and MAC addresses. Update the changed IPs into Milestone via The Boring Toolbox IP Import function Your cameras are now on-line Rename the cameras. In most instances the cameras we expected to be named one thing end up being renamed to something else. Why do it twice? Let’s rename onsite once the camera is in the final position Search for the camera MAC addresses Select and bulk rename hardware and devices using the find and replace function to quickly finish this task Set frame-rate and resolution across all devices using the settings function to apply consistent frame rate and resolution across all devices at once regardless of make or model Using the Advanced Group Management feature, dynamically create device groups based on model, log into management client and push out additional device specific settings in bulk (ie: Axis zipstream) Using search in the add group members function, quickly create device groups based on role or location then log into management client and assign permissions to those groups. Secure your Deployment When done with the configuration, you are ready to button up the configuration: Update all passwords to the permanent passwords When we started staging the cameras we used a temporary password on the cameras so that the install teams in the field can aim and focus the devices. But now that it’s time to wrap up, we want to secure the cameras using a unique password we can hand over to the client. Use the password management feature with synchronization to quickly update the passwords across Axis, Sony, Bosch, Hanwha and Arecont cameras while synchronizing those changes to Milestone XProtect Documentation and Sign-Off Finally, it is time to create the dreaded but oh so necessary documentation. We have noticed that it could take between 30 to 120s to create the documentation for just one camera depending on what information you need to record. For larger systems, this means hours of work to do correctly and is therefore sometimes overlooked. Using the camera reporting function we auto-magically create the final sign off report with all pertinent network, stream and camera details including credentials and point in time snapshots if desired. If using DHCP this report can also be provided to IT to create the DHCP reservations in their server. Present this documentation and get your sign-off Using this workflow and the features found in the Boring Toolbox can take your existing workflow, optimize it and save your teams from redundant, repetitive tasks while saving time and money. The great thing about this workflow is that the time savings increases exponentially as the size of the system grows. You can now rent the toolbox for 3 months, paying for itself with just one use. Reach out to us if you are interested in learning more at support@theboringlab.com.
The April “ISC West” Release v3.19.0409
Hot on the heels of our v3 release at the end of March we are releasing a new update filled with feature enhancements, performance tune ups and new integrations. Lets get into it. Feature Enhancements 1) Bulk updating IP Address, manual method We added the ability to select a certain set of cameras, or all your camera, and quickly update their IPs in bulk 2) Bulk importing of IP Address updates using Excel file For larger installations or whole network segment migrations we now offer an Excel (not CSV) import for IPs. Use the cameras management software to update the IPs on the cameras, export the report, import it into our template and upload to the Toolbox and you are done. 3) Create camera report by selecting one or many device groups Now create reports based on one or many devices groups as the filter. Giving you more flexibility to get the cameras you need on the report. 4) Create camera report by selecting one or many recording servers Now select more than one using a drop down multi-select list. 5) Added password synch for Sony cameras This has been tested on Sony Gen 5 cameras and above 6) Added password synch for Hanwha cameras Tested on Wisenet III cameras and above including X and P-series Hanwha cameras 7) Added password synch for Bosch cameras with validation Should support most modern Bosch cameras. We also included the password validation or Bosch cameras as they do require complex passwords Min 8 characters Max 32 characters At least 1 number At least 1 special character !? “#$%(){}[]*+-=.,;^_|~ Upper and lower case User name and password must differ 8) Added special characters option for auto generated passwords With the implementation of Bosch password synch and their use of complex passwords we have added the ability to create random passwords with special characters in order to meet the requirement. 9) Improved performance when loading “Add Members” & “Advanced Device Groups” dialog In really large data-sets we noticed a lag/delay when loading the dialogs for adding device members and advanced device group management and worked to reduce the load time and provide the user feedback on status. 10) Improved performance of loading hardware listing tree for large systems 11) Improved performance of loading device groups tree for large systems 12) Improved general application performance 13) Updated camera report file save dialog allowing user to change file name 14) Updated grid fonts for improved readability. Bug Fixes 1) Fixed bug related to hardware caching 2) Fixed hardware menu options ordering when toggling between recording servers, hardware, and devices 3) Fixed password update allowing same password to be used 4) Fixed various minor bugs
GDPR Security Camera Audit – wish there was a better way?

The General Data Protection Regulation (GDPR) is the most fundamental change to data laws so far, protecting the rights of citizens to control how, where and why their data is captured and used. As such, it has had far-reaching effects on the modern enterprise, and every business – pretty much worldwide – has had to evaluate their data, assess how it is stored, how it is secured, what it is used for. Even though the legislation relates exclusively to citizens of the European Union (EU), a vast number of companies worldwide need to think deeply about the data they capture, and work out if it will have an impact on EU citizens in any way. This has a very direct impact on each organisation’s security cameras, which of course are one of the most visible and obvious points for collecting data. Basically, if your cameras are collecting customer or staff data, then they must comply to EU regulations. GDPR compliance is a long-term project involving the redeployment of internal processes and information systems. The GDPR introduces new obligations to these organisations, especially the keeping of records for all surveillance-related activities. In protecting the rights of the individual to make sure they are happy with how their personal data footprint is captured and used, organisations everywhere have to be much more aware about their devices, what they record, how that information is stored, and why. In short – it means one hell of a big audit, and the need to capture a reliable snapshot of each and every camera in the network. Sounds painful, right? Painful but very necessary. Nobody wants to risk litigation for non-compliance. Time to bite the bullet and deploy precious time and resources towards documenting every camera in every room of every building in the company. Shame there isn’t an easier way, right? Well, here’s the caveat. This requirement plays very neatly into what we do for security administrators. The Boring Toolbox takes a whole lot of time, effort and pain out of conducting an audit of each camera. The Toolbox can take a snapshot of every camera, providing a simple, secure and reliable footprint of the security system’s digital assets. The Boring Toolbox report actually has camera snapshots built in as part of the software’s basic functionality, so running a report provides a very simple way of seeing each camera, taking notes on its settings and history, and applying any changes that need to be made in order to achieve GDPR compliance. Sound too good to be true? Try it out free here.
New Boring Toolbox Release, V3
We are super excited to release Version 3 of our Boring Toolbox! We spent much longer on this update than our normal 2 weeks cycle but that is because we have rebuilt The Boring Toolbox almost from the ground up with a focus on performance and smooth user experience. This was a critical step in being able to support larger systems and creates an even more robust platform for growth and simplified management. Here are some of the enhancements in v3: Reduced loading times of the application by 85% on systems larger than 5000 cameras ie: For 10,000 cameras 46 sec vs 5 min 20 sec (v3 vs v2) Optimized UI Components for large data sets, 4000+ Device Groups, 100,000+ Devices Some include: Provides seamless selection of large number of cameras Faster, smoother searching throughout Smoother transitions after saving Instant loading of password manager Optimized generating camera report by approximately 60% Benchmark: 52 sec for 865 cameras with snapshots and credentials Optimized Hardware, Device Groups, and Password Management filtering by up to 75% Updated login loading progress when application starts Updated application dashboard with ‘Enabled Hardware’ & ‘Disabled Hardware’ Updated ‘Add Group Members’ dialog with drill down filtering by search string, recording server, and device status. Added non-blocking notifications after operations complete Added clickable camera report link to open the file with the default associated application (if available) Below is the data set we used for testing 🙂 Download the latest version of The Boring Toolbox here or if you do not have a license try it for free here.
Milestone Admins, We have to do more in 20 min. Here is How.

Considering that the basic premise for ALL surveillance systems worldwide has, for many years, relied on real live humans to watch cameras, set those cameras up in optimal environments, maximize use of networks, then tie all that information into a VMS, it is kind of astonishing how inefficient that system really is. Add to this the act of maintaining that network of cameras – updating passwords, firmware, adding and removing components, moving cameras around to gain greater efficiencies – and it is apparent that there are many layers of the process which rely on humans to perform, well…tasks that are repetitive and kind of dull. Studies have proven that even the best security administrators, highly trained and dedicated to their role though they might be, start to drift off after only twenty minutes. Now, astral-travelling might be fun sometimes, and in the right circumstances it can apparently be beneficial, as it gives the tired mind a little breathing space, like having a power nap. However, considering that the safety and well being of perhaps thousands of innocent people might be riding on that security admin’s bright-eyed enthusiasm and attention to the details required to correctly set up a medium to large VMS, that twenty-minute ‘sweet spot’ for effective management is a real problem. “..that fatigue will inevitably lead to errors, which reduce the efficiency…” Nobody is to blame for this issue – it is simply a fact of life. With relatively limited stimulus the human brain can only stay focused for so long before it gets bored, and no amount of coffee is going to fix it. But when you consider that literally every surveillance system in the world is operating on a flawed premise – that every setting on every camera is optimized, all firmware is up-to-date, passwords are consistently changed to avoid a cyber breach or hacked camera, and that someone or even some team has the time and the focus to efficiently monitor, audit and remediate issues – it becomes clear that the world needs to find a better way. Breaking it down Breaking those issues down, it is possible to address all of them in a much more efficient manner, whereby a security administrator can save as much as 97 percent of the time it takes to perform routine tasks. Changing passwords for example? That generally takes around 30 seconds. Consider one tired admin changing passwords on 500 cameras, and that is a whole lot of repetitive work. A tool that allows mass changes to the VMS across all of those 500 cameras, regardless of make or model, will save countless hours of manual input. Changing camera settings is a similar process, and again can be optimized massively by utilizing a tool that can make those changes in bulk. Changing codec, frame rate, resolution, streaming mode, motion detection threshold and smart codecs can/should all be performed in bulk using appropriate tools, which again saves our jaded admin an awful lot of repetitive manual input. Monitoring those camera settings and generating reports is a vital part of running an efficient security ecosystem. Providing information on stream resolution, IP/MAC address, device credentials and drivers along with a snapshot of each camera from the VMS will provide an easy way to monitor, audit and remediate any settings that are not conforming to the set standard. Repetitive tasks are inherently arduous, and lead to fatigue. Coupled with a heavy workload and multiple manual keystrokes, that fatigue will inevitably lead to errors, which reduce the efficiency of a system as well as effectively waste countless hours of a highly trained professional’s working life. It is necessary to find a better way to perform these vital tasks, before the twenty-minute syndrome marginalizes both hard work, and a sophisticated video management system (VMS). Tools like The Boring Toolbox can make this a reality…..
02/12/2019 Release : HTTPS Enable, Partial IP Searching
Service version : 2.19.0121Client version : 2.19.0205 Set HTTPS in Bulk in XProtect HTTPS is becoming a minimum in higher security deployments and unfortunately HTTPS needs to be enabled in Milestone after the camera is already added to the VMS. Doing this manually takes at minimum 5 step per camera but can take much more depending on how your system is organized. We wanted to make it easier for you to secure your cameras with HTTPS. The new version of The Boring Toolbox now adds the following: Added a new menu context to enable and disable HTTPS in bulk Added an identifier to the hardware device to visualize which cameras already have HTTPS enabled (see the lock on the hardware below?) In order to finish the process of enabling HTTPS in Milestone you will need to disable and then enable the hardware. Performing this insures that Milestone re-authenticates with the camera over HTTPS and allows you the time to check that the camera still streams video. Due to this requirement we made sure that all the cameras you checked to enable HTTPS on will remain checked after that operation so that you can immediately disable and re-enable the cameras in Boring Toolbox all at once. Enabling HTTPS on 100s of cameras at once is now a 4 click process! HTTPS now in reporting We added HTTPS to the camera report in a previous version in preparation for this new update. So now, once you update your cameras with HTTPS, you can report on this and audit which cameras your missed and which still need HTTPS applied to them. This field is reported on by default now. Partial IP Search You can now search for cameras, in all tabs, by partial IP address (or subnet). You will need to provide at least 7 characters inclusive of dots (.) for it to trigger the partial IP search. This is amazingly useful if you misnamed something or if you want to apply settings in bulk by subnet. UI Improvements for larger systems Improved tree rendering on medium systems (1000+).
02/01/2019 Release : Arecont Password Sync & Settings Support
Service version : 2.19.0121Client version : 2.19.0129 Password Manager: Sync for Arecont Cameras We integrated the Arecont API into the Boring Client so that you can now easily change passwords in Arecont cameras and in Milestone at the same time! Below is an image of what you should see when updating passwords on Arecont Vision cameras. It will present the green circle with white check mark to indicate that sync is supported on the camera. Password Manager: Copy the current passwordWe have implemented a simple but very useful feature. In the password manager you are now able to select the password and press Ctrl+C to copy just the password. This is possible even when the password is hidden! This is great if you use long complex passwords or random passwords for each camera and you want to easy way to log directly into the camera’s interface. This feature, along with our search functionality essentially turns Milestone XProtect in to your very own Camera Password Manager.Settings : Custom Resolutions In Milestone XProtect VMS Arecont Vision use a driver that requires the user to set an X and Y pixel count to define the resolution of the camera which was not previously supported in our settings feature. To solve this we built a custom method of setting Arecont Vision resolutions in Milestone VMS in bulk and per stream. When going to Hardware > Selecting the camera > Pressing “Settings” > Resolution tab you will now see a “Custom” selection under the resolution drop down that will allow you to manually enter the resolution for Arecont Vision cameras. Currently “Custom” option will only show if an Arecont camera is selected. Min and Max are also supported options for Arecont cameras and will populate the values from the driver.
