Close
Close

How to Connect an Axis Camera to a Strobe Light Using MQTT & Node-RED

Want to trigger a strobe light when your Axis camera detects motion? This guide shows you how to integrate MQTT and Node-RED for seamless automation.

Ever wanted to automatically trigger a strobe light when your security camera detects movement?

In this guide, we’ll walk through how to connect an Axis camera using Object Analytics (AOA) to a D4100 strobe using MQTT messaging.

This integration creates a powerful automated response system that can enhance your security setup.

Prerequisites: What You'll Need

Before we begin, make sure you have:

  • An Axis camera with Artpec 7/8/9 (we’re using P3255-LVE in this example)
  • Raspberry Pi 5
  • Axis D4100-E strobe siren
  • Node-RED installation
  • Basic networking knowledge

Understanding the Components

Before we dive into the setup, let’s quickly understand two key components we’ll be using:

Node-Red

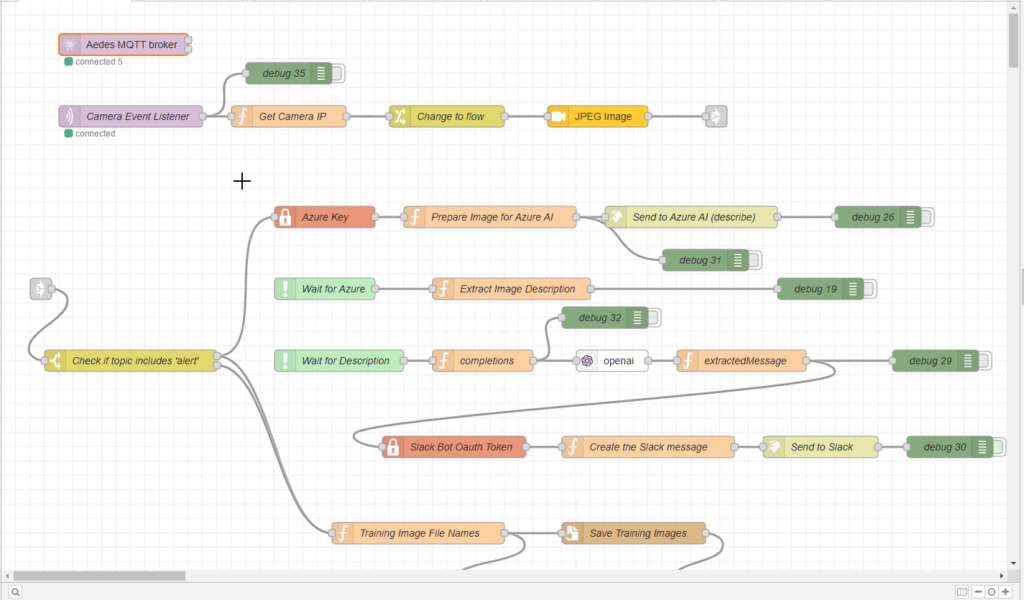
Node-RED is a powerful flow-based programming tool that makes it easy to connect hardware devices, APIs, and online services.

Think of it as a visual way to wire together different pieces of your smart system – perfect for our camera-to-strobe connection.

MQTT (Message Queuing Telemetry Transport)

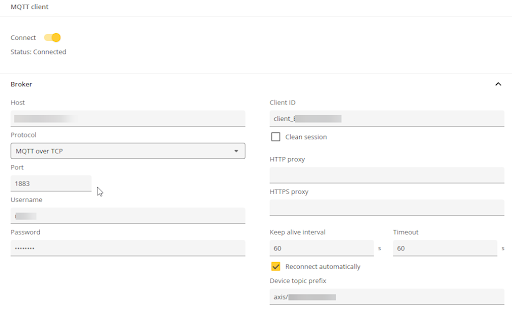
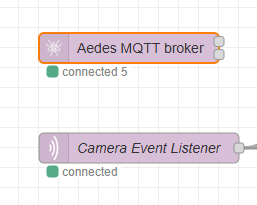
MQTT (Message Queuing Telemetry Transport) is a lightweight messaging protocol that’s ideal for connecting devices. It works on a publish/subscribe model – in our case, the camera will publish messages, and the strobe will subscribe to receive them. There are various MQTT brokers available, both commercial (like HiveMQ, CloudMQTT) and open-source (like Mosquitto). We’ll be using AEDES, a simple but effective broker that integrates directly with Node-RED. While AEDES is limited in features compared to some commercial options, it’s free and particularly easy to use for projects like this.

Step-by-Step Tutorial for Automatically Triggering a Strobe Light When Your Security Camera Detects Movement

1. Set Up Node-RED

Let’s start by setting up Node-RED on your Raspberry Pi

1. Open terminal on your Raspberry Pi

2. Update your system:

sudo apt update
sudo apt upgrade

3. Install Node-RED

bash <(curl -sL https://raw.githubusercontent.com/node-red/linux-installers/master/deb/update-nodejs-and-nodered)

4. Enable Node-RED to start on boot:

sudo systemctl enable nodered.service

5. Start Node-RED

sudo systemctl start nodered.service

Important Security Note

By default, Node-RED isn’t secured. Before proceeding further, you should:

  • Set up HTTPS
  • Configure an admin password
  • Enable authentication

2. Set Up MQTT Broker

  1. In Node-RED, install the AEDES package from the palette manager
  2. Drag an AEDES broker node to your workspace
  3. Double-click the node to configure it
  4. Go to the security tab
  5. Set up MQTT username and password (save these for later use with the camera)
  6. Click Done to save the configuration

3. Configure Your Axis Camera

3A. Set Up Object Analytics (AOA)

  1. Log into your Axis camera
  2. Configure AOA with a basic rule (named “Scenario1”)
  3. For detailed AOA configuration, refer to the Axis Object Analytics Manual

3B. Configure MQTT in the Camera

  1. Navigate to System > MQTT in your camera’s web interface
  2. Enable the “Connect” switch
  3. Configure the broker settings:
    • Host: Enter your Node-RED IP address
    • Protocol: Select “MQTT over TCP”
    • Port: Match with your AEDES configuration
    • Enter the credentials you set in the AEDES broker
    • Client ID: Leave as default
    • Topic prefix: Keep the default “axis/macaddress” (The topic prefix helps organize MQTT messages by combining with your specified topic. Note: “macaddress” here is just a placeholder – by default, each camera will use its own unique MAC address in this prefix. For example, if your camera’s MAC address is A8:B1:D3:11:22:33, the actual prefix would be “axis/A8B1D31122334”. This means each camera will have a different prefix by default, though you can customize this once you’re familiar with the system. When your topic is “alert-scenario1”, the full MQTT message will be “axis/A8B1D31122334/alert-scenario1”)

3C. Set Up the Event Rule

  1. Go to System > Events > Rules
  2. Click “Add rule”
  3. Configure the new rule:
  • Name: “Send Event to MQTT Broker (Line Cross)”
  • Condition: Select “Use as trigger” and choose your “Scenario1”
  • Action: Choose “Send MQTT publish Message”
  • Topic: Enter “alert-scenario1”
  • Enable “Use device prefix”
  • Leave Payload empty and QoS at 0

4. Configure the D4100-E Strobe Siren

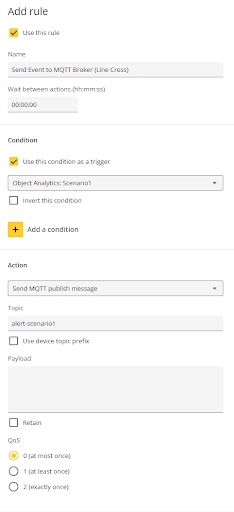
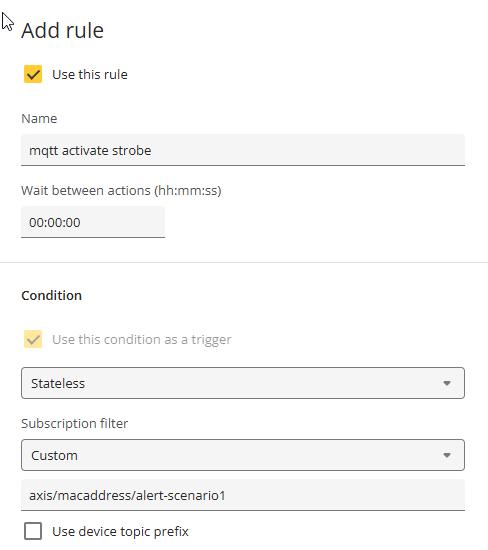
Configuring the siren is very similar to configuring the camera with an additional step to allow the siren to listen to the AOA messages. We will elaborate on this more below. 

4A. MQTT Setup

  1. Access the strobe’s web interface
  2. Navigate to System > MQTT
  3. Configure similarly to the camera:
    • Enable “Connect”
    • Enter the same broker details
    • Use the same credentials
    • Keep default topic prefix

4B. Set Up MQTT Subscriptions

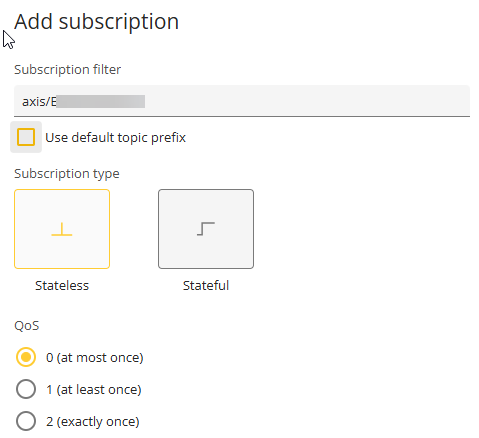
Since the siren needs to respond to messages from our P3255-LVE AOA scenario, it needs to subscribe (listen) to those messages. This is where the publish/subscribe model of MQTT comes into play – while our camera publishes alerts, the siren subscribes to receive them.

  1. Find the “MQTT Subscriptions” tab
  2. Click “Add subscription”
  3. Configure:
    • Subscription filter: “axis/macaddress/alert-scenario1” (Remember to replace “macaddress” with your camera’s actual MAC address as shown in its MQTT settings)
    • Uncheck “Use default topic prefix”
    • Type: “Stateless”
    • QoS: 0

4C. Create the Event Rule

  1. Go to System > Events
  2. Add a new rule:
    • Name: “mqtt activate strobe”
    • Condition: Select “stateless”
    • Enter the subscription filter: “axis/macaddress/alert-scenario1”
    • Uncheck “Use device topic prefix”
    • Set your desired schedule
    • Action: “Run light and siren profile”
    • Select your preferred profile
    • Action: “Start”

5. Finalize the Node-RED Flow

  1. Drag an MQTT-in node to your workspace
  2. Configure the connection:
    • Server: 127.0.0.1
    • Enable “Connect automatically”
    • Protocol: MQTT v3.11
    • Enter your broker credentials
  3. Configure the node:
    • Subscribe to: “axis/macaddress/alert-scenario1” (Use your camera’s actual MAC address here)
    • QoS: 2
    • Output: Auto detect
    • Name: “Camera event listener”

6. Test the Setup

At this point, all the components are configured and connected through MQTT messaging.

Once everything is configured, test your system:

  1. Trigger the AOA scenario in your camera’s view
  2. Watch for the MQTT message in Node-RED
  3. Verify that the D4100-E strobe activates

Your system is now set up to automatically trigger the strobe when the camera detects movement according to your AOA settings.

This integration provides a powerful automated response system that can enhance your security setup.

Remember to regularly test the system and adjust the AOA settings as needed for your specific environment.

Oh, now you can start having a lot of fun with it 🙂

If you found this tutorial helpful, you’ll love The Not Boring Newsletter—our monthly email packed with time-saving security tips, hands-on tutorials, and other cool industry insights.

📩 Subscribe now and stay ahead with the latest tricks to make security management smarter, faster, and way less boring.


Team Boring

Your go-to XProtect eXPerts. We learn the technical stuff that will save you time and make it less boring.

Team Boring

Your go-to XProtect eXPerts. We learn the technical stuff that will save you time and make it less boring.

You Might Also Enjoy…