Close
Close

Close
Close
The Milestone Driver framework unleashes even more functionality and possibilities for your XProtect VMS by allowing third-party device manufacturers to develop their own XProtect drivers.
In this blog, I’m going over how I integrated a non-supported device into XProtect using a third-party Milestone driver on my home VMS. Follow along with me so you can reap the benefits of the MIP Driver Framework in your own system!
Prior to the Milestone driver framework, the only way to integrate a non-supported device into Milestone XProtect was to use the generic/universal driver, which had limited functionality and was a pain to use.
In 2019, Milestone released the Milestone Driver Framework. The driver framework allows third-party device manufacturers to integrate their devices into Milestone XProtect by developing their own XProtect drivers.
While not widely used, the benefits of the custom driver are many:
I haven’t seen many third-party driver integrations yet. Still, I did have the opportunity to install a GJD IP IR illuminator on my home and wanted to share the experience.
The IM-8-IP is an IP-controlled IR illuminator made by GJD and can be configured by its web interface or added to Milestone for extended functionality. I chose to integrate it into Milestone using the third-party drivers from GJD.
Here’s how I did it.
It took me a second to realize that all the documentation is on the Milestone Marketplace. Once at the marketplace page, click on How to Install and scroll down. Download the following:
The illuminator is not DHCP enabled, so if you have more than one, you will need to bring them onto the network and change their IP addresses one by one. The default IP address is 192.168.0.10.
The best way to describe the GJD gateway service is a middleware between the physical devices and the Milestone Driver Framework.
It’s light and easy to install. Once installed on the management server, there will be an icon on the desktop.
Double click that to open the gateway configuration page.
1. On the configuration page, click “Add

2. Enter the device details
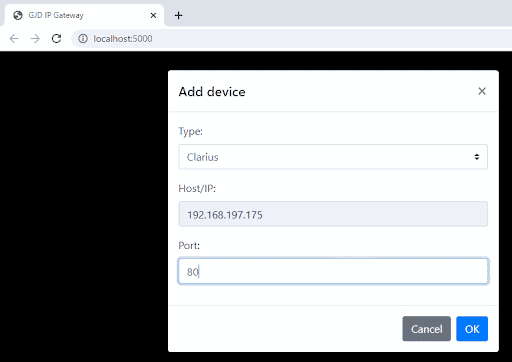
3. It will now show up on the Devices page

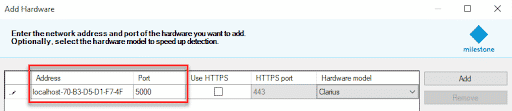
The third-party GJD drivers are installed on the XProtect recording server.
Note: You might see it under “other” as well. I am not sure why it shows up differently on some systems. Also, if the MIPDriver folder does not already exist, create it on your own.
Adding a third-party device is just like adding a supported camera. Super easy.

Once added, the events in the IM-8-IP are wiped out and replaced with events that match the new Milestone actions!
Ok, you finally have it in Milestone, so what can you do with it?
Control of the illuminator happens through the inputs and outputs, and enabling the output will turn on the illuminator.

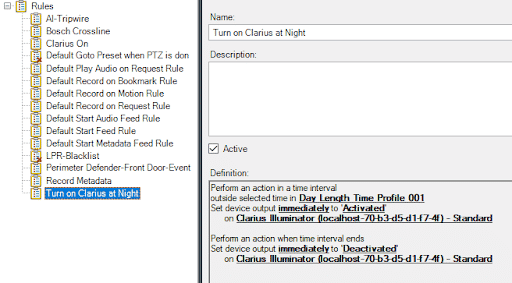
Now that the illuminator is in Milestone, you can use all Milestone features and functions to control and manipulate the device, including adding it to rules.
For example, the rule below turns the IR on at night and off during the day.
If you’re looking for even more possibilities with your XProtect VMS, the Milestone Driver framework is a great option to explore. By allowing third-party device manufacturers to develop their own XProtect drivers, you can extend Milestone to support non-security device types and get quicker turnaround times when integrating new devices into Milestone.
This use case was just one of many possibilities within the Milestone Driver Framework. I hope you can see the power behind it!

Your go-to XProtect eXPerts. We learn the technical stuff that will save you time and make it less boring.
Your go-to XProtect eXPerts. We learn the technical stuff that will save you time and make it less boring.
Sign up for a 30 Day Free Trial of The Boring Toolbox and start using our time-saving features today.
Sign up for our [NOT so] Boring Newsletter to get a monthly dose of XProtect tips, security trends, and a touch of humor delivered directly to your inbox.