This step-by-step guide shows you how to access Milestone XProtect from anywhere using Tailscale. It’s secure, simple, and way less...
Looking to get more out of the way video is displayed in XProtect Smart Client (AKA your views)? There can be an unrestricted number of views which include video and other types of content like images and text, allowing the control and organization of switching from various groups of cameras.
Views must be contained within view groups, adding to your internal tidiness.

Before you can pull cameras into a view in Smart Client they need to be part of a device group. Your XProtect admin may have already be preconfigured these for you. However, if they’re not there and you want to add one for yourself then start by heading to the XProtect management client and great a new group.
Picture this: you have cameras installed on five different levels of a multi-story building in the city center and you want to create a view for each floor in that location for quick access. So, you will want to create five devices groups, one for each floor.
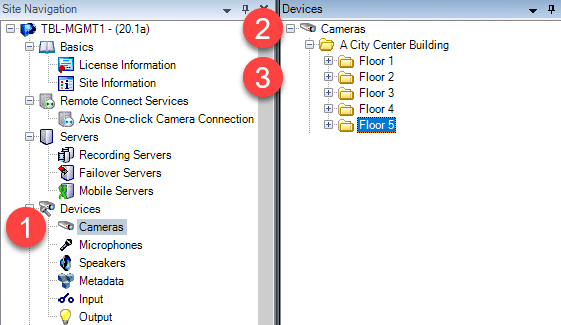
Step #1. Log into the Milestone XProtect Management client and browse to “Devices” and then “Cameras”
Step #2. You will now see a device tree on the right with the word “Cameras” at the top. Right click on cameras and select “Add Device Group”. You can name the device group anything you would like but in this example we named is “A City Center Building”.
Step #3. Create a sub-folder for each floor by right clicking on the “A City Center Building” and selecting “Add Device Group”. Do this another four times, once for each additional floor.
Step #4. You can add cameras to the device groups by right clicking on the device group and selecting “Edit Device Group Members”. This will open a dialog box which will allow you to select the cameras you would like in that group. Repeat this for each group.
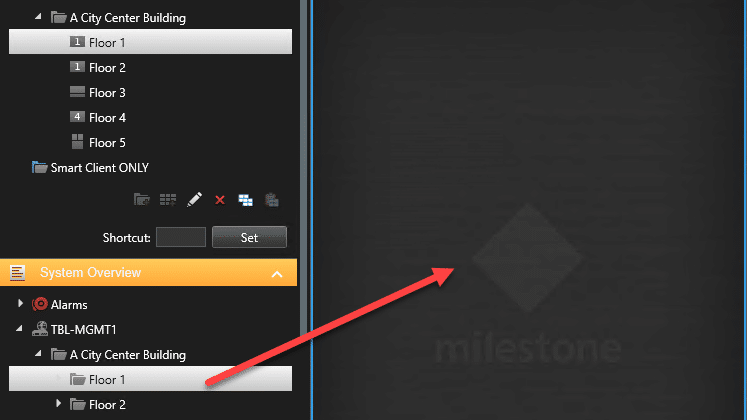
Step #5. You can now log into Smart Client and see your new view groups under “System Overview”.
PRO TIP: You can do this even faster with Boring Toolbox’s ability to add devices with search.


Now, let’s say you want to view or playback video in XProtect Smart Client. First, you must create a view where the cameras are added and arranged. Before creating a view, you need to create a group it could go into.
Step #1. In the right corner of the Smart Client, click Setup to enter setup mode. You will see section headers turn orange.
Step #2. In the Views pane, select and right click on either the Private or Shared top-level folder you want to add a group to and select New Group. You can name this group whatever you would like.
Step #3. Right click on the new group and select New View. You can now browse and select a layout for your cameras. Rename the new view. In our example, Floor 1.
Step #4. To add cameras to the view find System Overview on the bottom left of the Smart Client. Now find your management server host name and expand the tree. Here you will see the device groups you have previously created.
Step #5. Click and drag the device group over to the first tile in your new view. This will populate all the cameras from that device group into the view automatically!
Step #6. Repeat for the rest of the floors
Step #7. Click Setup again to save your work

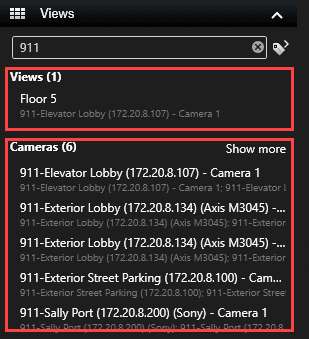
If you have a large or complex tree of view groups, the search function will make navigating easier and save you the aggravation of manual search. You can find views and cameras searching your chosen keyword. Consider it an internal Google for your camera views.
For example, the image below shows what I see when searching “911” on our demo system.

When you enter the search words, matching results for views and cameras are displayed. When one or more of these matches is selected it will show up on screen in a temporary view that has been optimized to how many camera’s there were available per selection option.
Under view mode, you could also:
Managing video becomes easy and time-saving with these smart client features and you will be able to see these views on any device PC or mobile that you connect to Milestone XProtect with.

Your go-to XProtect eXPerts. We learn the technical stuff that will save you time and make it less boring.

Your go-to XProtect eXPerts. We learn the technical stuff that will save you time and make it less boring.

This step-by-step guide shows you how to access Milestone XProtect from anywhere using Tailscale. It’s secure, simple, and way less...

Our new Identity and Access Management (IAM) platform makes it easy to manage what your users can see and do...

Security and IT often feel like they're speaking different languages—but they’re really solving the same problem from opposite ends. Based...
Subscribe to get a monthly dose of security & surveillance industry news and insights, Milestone VMS time-saving tricks, tips for hacking your way out of boring work sent directly to your inbox!